Authentication
Introduction
This guide explains the OAuth authentication process. Each client must be pre-registered with a client_id and client_secret —without these credentials, the authentication will not work.
Client Registration
Before starting the authentication process, each client must be registered and assigned a unique client_id and client_secret for secure identification.
Steps:
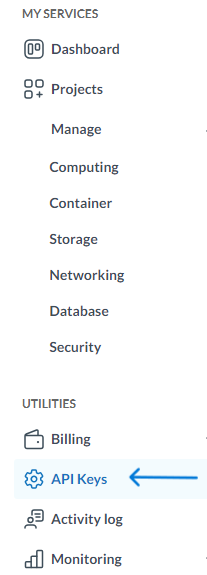
- Sign in into the New Aruba Cloud Management Platform, navigate to API section, and generate a new credential.
a. In the sidebarmenu menu, select 'API Keys'
b. Select the 'Create API key' button in the top right

c. Follow the wizard to create a new api key, and be sure to copy the API Secret as it will only be shown once.
 2. Securely store your API key and secret for future use during authentication. The
 api_key and api_secret are tied to your user account and are required to access the Aruba API using the OAuth2 Client Credentials flow.
Your api_key and api_secret pair will be used as client_id and client_secret during the authentication process.
OAuth Authentication Flow
The authentication flow is designed for quick and efficient testing. It involves generating an access token for the test user using the registered client_id and client_secret. (see the previus step)
The FQDN for generating the token is https://mylogin.aruba.it/auth/realms/cmp-new-apikey/protocol/openid-connect/token
Steps:
- Execute an OAuth request to obtain an access token
- Provide the registered
client_idandclient_secretas part of the authentication. - Store the access token for future use.
For developer support, you can use this postman collection:
Set Environment Variables:
| Variable | Description |
|---|---|
| client_id | The client_id provided by Aruba (api_key) |
| client_secret | The client_secret provided by Aruba (api_secret) |
To use the access token, enter the value 'Bearer {token}' in the 'Authorization' field
cURL Command Example
curl -X POST https://mylogin.aruba.it/auth/realms/cmp-new-apikey/protocol/openid-connect/token \
     -H "Content-Type: application/x-www-form-urlencoded" \
     -d "grant_type=client_credentials" \
     -d "client_id=YOUR_CLIENT_ID" \
     -d "client_secret=YOUR_CLIENT_SECRET"
Windows PowerShell Example
$tokenUrl = " https:/mylogin.aruba.it/auth/realms/cmp-new-apikey/protocol/openid-connect/token"
$clientId = "YOUR_CLIENT_ID"
$clientSecret = "YOUR_CLIENT_SECRET"
$body = @{
    grant_type    = "client_credentials"
    client_id     = $clientId
    client_secret = $clientSecret
}
$response = Invoke-RestMethod -Method Post -Uri $tokenUrl -ContentType "application/x-www-form-urlencoded" -Body $body
$accessToken = $response.access_token
Write-Host "Access Token: $accessToken"
Conclusions
By following these steps, you can successfully implement the OAuth authentication process. Remember to register each client with the required credentials to ensure the process works correctly.